


Hand X-rays: The Superpower Supertool
Hand X-ray Origin
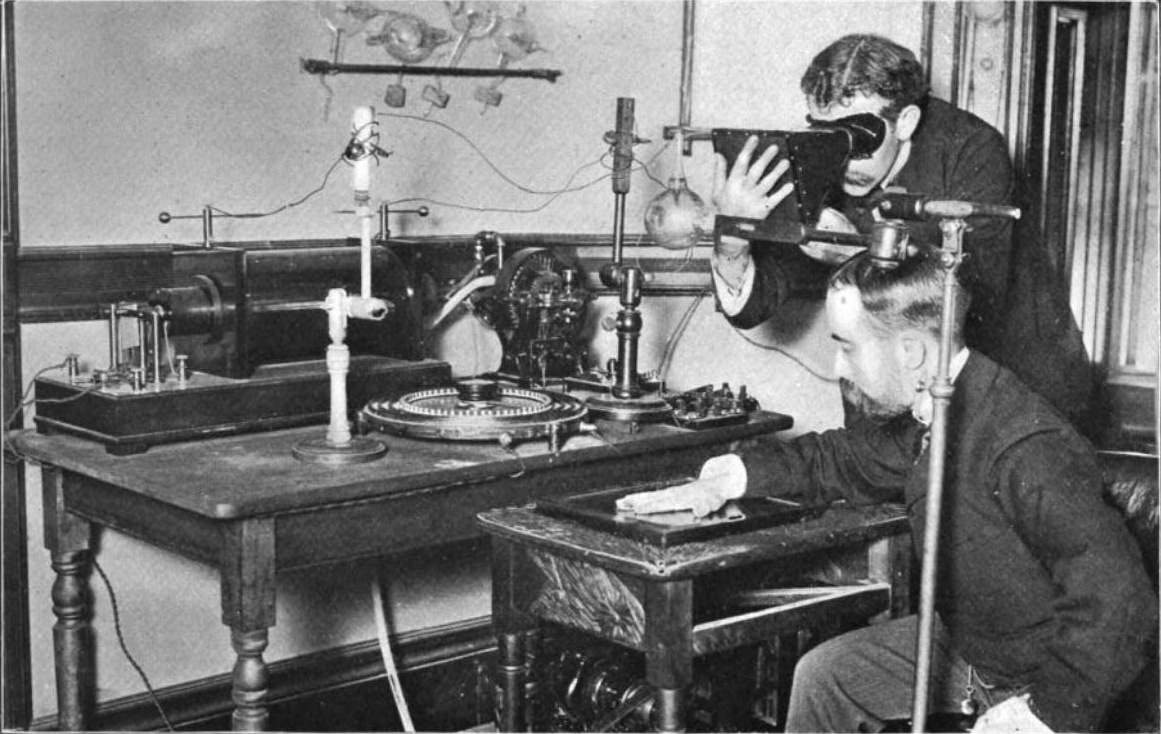
If you had X-ray vision, what would you choose to study? How about something as simple and yet complex as your own hand? That is what German physicist Wilhelm Röntgen chose after discovering highly energetic electromagnetic radiation, better known as X-rays. The finding came in 1895 and only a year later Glasgow opened a radiology department, where doctors took a look at kidney stones and foreign objects lodged in children’s throats, all while keeping their bodies in tact: a revelation. Although doctors no longer had to cut open the body to see what was on the inside, the then X-raying process was nowhere near as convenient as it is today. In the 19th century, the radiation dosage was 1,500 times greater than it is today, leaving patients with radiation burns and hair loss, and the doctor’s visit was no walk in the park, either. While today’s scans take a whole 20 milliseconds out of your day, technology of the 1890s took closer to 90 minutes but the trials and tribulations were worth the existence and progress of of one of the medical world’s greatest tools. Unfortunately, the history of Röntgen’s discoveries and how they came about is left up to claims and accounts, as his records were burned after his death upon request.
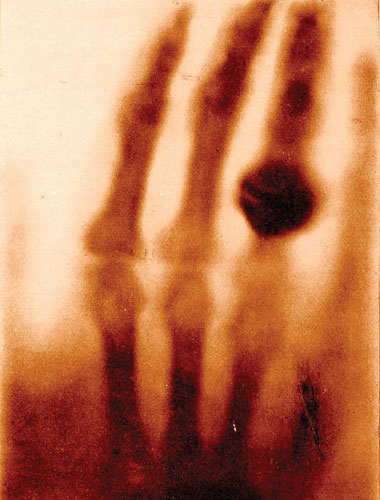
Wilhelm Rontgen radiographic image of his wife’s left with her wedding ring on December 22, 1895, shortly after his discovery of X-rays.
NATIONAL LIBRARY OF MEDICINE
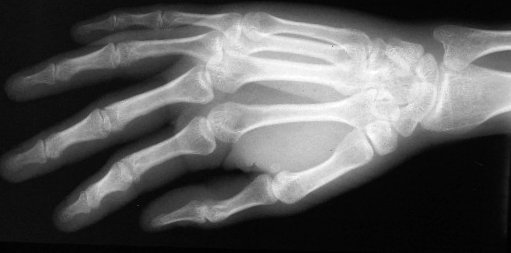
Today, an X-ray of your hand will reveal a black and white image of the bones and soft tissues that get your fingers going. By taking a look inside through this noninvasive procedure, doctors are able to find fractures, injuries, or other issues such as degenerative diseases that take shape in the hand.
How to prepare?
If you are planning on getting an X-ray of the hand, the preparation required is minimal. Eating, sleeping, and drinking will have no effects on the results. Simply remove jewelry and accessories from your hands, as to not obstruct the sight of bones and make hand manipulation more accessible for the picture taking process. If you are experiencing swelling in the hand and are not capable of removing the jewelry, the image might be blocked but the X-ray test and process will not be affected. Be sure to notify the technician if you are pregnant, or think you may be pregnant. Radiation exposure might have an affect on the fetus, though the risks are slim, as the radiation exposure is the least amount necessary to produce an image. A protective apron that is lined with lead may be given to you through the duration of the X-ray to women and children to protect sensitive organs. The exposure of radiation is just about one second and risks are minimal. Researchers believe that diagnostic benefits highly outweigh the brief exposure.
The procedure
The hand is stationed in various positions on an examination table, as pictures are taken. The image is captured with electromagnetic radiation that passes through the body. The X-ray process on its own is not a painful one. However, in the case that bone fractures, tumors, or arthritis is present in the hand, pain may or may not be felt.
What to do with the hand?
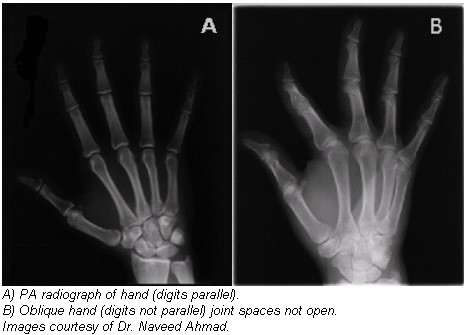
In an article published originally on AuntMinnie.com, Dr. Naveed Ahmad explains the radiologic patient positioning techniques for x-ray examinations.
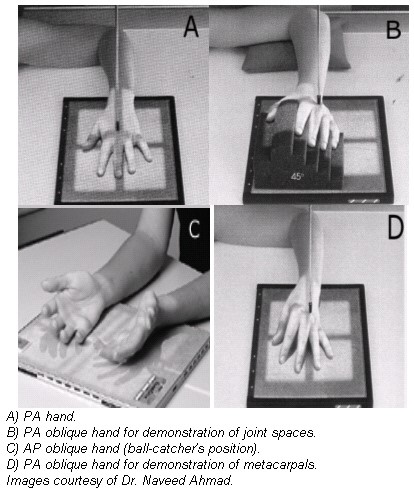
Radiographic positioning of the hand 
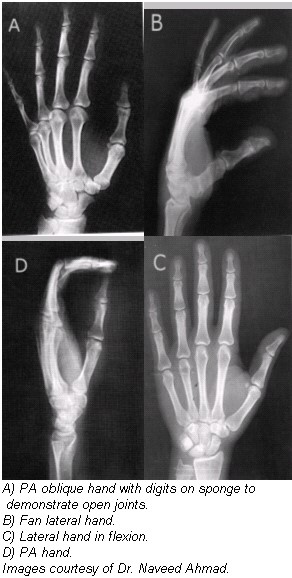
Radiographic examination of the hand is performed using posteroanterior (PA), oblique, and lateral projections. The PA projection is the best conventional view for demonstrating malalignment, joint-space narrowing, and soft-tissue abnormalities in early rheumatoid arthritis, while the anteroposterior (AP) oblique projection (“ball-catcher” position) is commonly used to look for early evidence of rheumatoid arthritis at the second through fifth proximal phalanges and metatarsophalangeal (MP) joints. Both hands are generally exposed, with the contralateral image used for bony structure comparison.
Technical factors
- Image receptor (IR), 10 x 12 inch (24 x 30 cm) crosswise for two or more images on one cassette.
- Digital screen, use lead masking.
- Detail screen, tabletop.
- 50-60 kVp range, mAs 3-4.
- Minimum SID of 100 cm.
Positioning for PA projection
- Seat the patient at the end of the radiographic table and adjust the patient’s height so that their forearm is resting on the table.
- Rest the patient’s forearm on the table and place the hand with the palmar surface down on the cassette.
- Center the cassette to the metacarpophalangeal (MCP) joints, and adjust the long axis of the cassette parallel with the long axis of the hand and forearm.
- Spread the fingers slightly.
- Ask the patient to relax the hand to avoid motion. To prevent involuntary movement, use adhesive tape or positioning sponges. A sandbag may be placed over the distal forearm.
- Central ray (CR): Perpendicular to the third MCP joint
Evaluation criteria
- The entire hand, wrist, and about 2.5 cm of the distal forearm should be visible.
- MCP and interphalangeal joints should appear open, indicating correct CR location and that hand was fully pronated. The long axis of the hand and wrist should be aligned to the long axis of the IR.
- No rotation of hand as evidenced by the following: the symmetric appearance of both sides or the concavities of the shafts of metacarpals and the phalanges of digits 2 through 5; and the amount of soft tissue on each side of phalanges 2 through 5 appears equal. The digits should be separated slightly with soft tissues and should not be overlapping.
Positioning for PA oblique projection
- Rest the patient’s forearm on the table with the hand pronated and the palm resting on the cassette.
- Adjust the obliquity of the hand so that the MCP joints form an angle of approximately 45° with the cassette plane.
- Use a 45° foam wedge to support the fingers in the extended position to demonstrate the interphalangeal joints.
- When examining the metacarpals, obtain a PA oblique projection of the hand by rotating the patient’s hand laterally (externally) from the pronated position until the fingertips touch the cassette.
- Elevate the index finger and thumb on a suitable radiolucent material if it is not possible to obtain the correct position with all fingertips resting on the cassette. Elevation will open the joint spaces and reduce the degree of foreshortening of the phalanges.
- Center the cassette to the MCP joints and adjust the midline to be parallel with the long axis of the hand and forearm.
- CR: Perpendicular to the third MCP joint.
Evaluation criteria
- Entire hand, wrist, and about 2.5 cm of the distal forearm should be visible.
- Fingers should appear equally separated, with phalanges in the lateral position and joint spaces open, indicating fingers were parallel to IR.
- Thumb should appear in a slightly oblique position completely free of superimposition, with joint spaces open.
- Long axis of hand and wrist should be aligned to the long axis of the IR.
- Hand and wrist should be in a true-lateral position evidenced by the following: Distal radius and ulna superimposed; metacarpals are superimposed.
Positioning for AP oblique projection (ball-catcher position)
- Seat the patient at the end of the radiographic table. Have the patient place the palms of both hands together.
- Center the MCP joints on the medial aspect of both hands to the cassette. Both hands should be in the lateral position.
- Place two 45° radiolucent sponges against the posterior aspect of each of the patient’s hands to a half-supinate position until the dorsal surface of each hand rests against each 45° sponge support.
- Extend the patient’s fingers, and abduct the thumbs slightly to avoid superimposition over the fingers.
- CR: Perpendicular to the point midway between both hands at the level of the MCP joints for either of the two patient positions.
Evaluation criteria
- Entire hand, wrist, and about 2.5 cm of the distal forearm should be visible.
- Fingers should appear equally separated, with phalanges in the lateral position and joint spaces open, indicating fingers were parallel to the IR.
- Thumb should appear in a slightly oblique position completely free of superimposition, with joint spaces open.
- Long axis of hand and wrist should be aligned to the long axis of the IR.
- Hand and wrist should be in a true-lateral position, evidenced by the following: Distal radius and ulna superimposed; metacarpals should be superimposed.
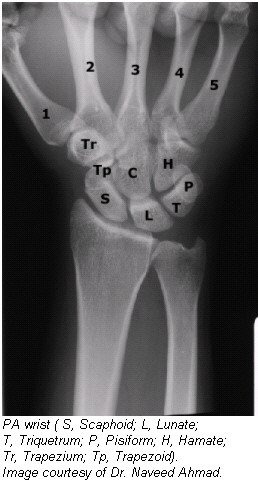
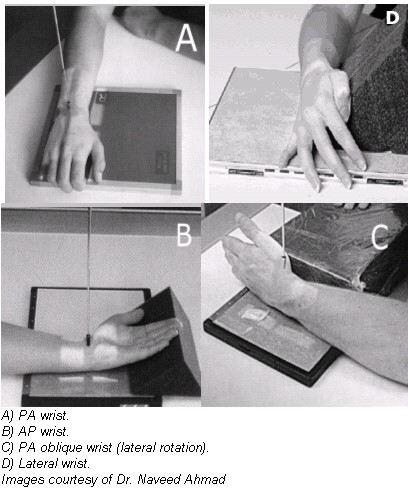
Radiographic positioning of the wrist
The routine radiographic examination of the wrist uses the frontal and lateral projections. The PA radiograph is best obtained with the arm abducted 90° from the trunk and the forearm flexed at 90° to the arm. For the evaluation of arthritis, oblique projections also are necessary. These latter projections should include radiographs exposed with the wrist in both a semipronated oblique and a semisupinated oblique position.
Technical factors
- IR: 10 x 12 inch (24 x 30 cm) crosswise for two or more images on one cassette.
- Digital screen, use lead masking.
- Detail screen, tabletop.
- 50-60 kVp range, mAs 4-5.
- Minimum SID of 100 cm.
Positioning for PA wrist projection
- Have the patient rest their forearm on the table, and center the wrist to the cassette area.
- Seat the patient low enough to place the axilla in contact with the table, or elevate the limb to shoulder level on a suitable support.
- Adjust the hand and forearm to lie parallel with the long axis of the cassette.
- Slightly arch the hand at the MCP joints by flexing the digits to place the wrist in close contact with the cassette.
- CR: Perpendicular to the midcarpal area
Positioning for AP wrist projection
- Seat the patient at the end of the radiographic table.
- Have the patient rest the forearm on the table, with the arm and hand supinated.
- Place the cassette under the wrist, and center it to the carpals.
- Elevate the digits on a suitable support to place the wrist in close contact with the cassette.
- Have the patient lean laterally to prevent rotation of the wrist.
- CR: Perpendicular to the midcarpal area.
Evaluation criteria for AP and PA wrist
- The carpal interspaces are better demonstrated in the AP image than the PA interspaces; they are more closely parallel with the divergence of the x-ray beam.
- Long axis of the hand, wrist, and forearm is aligned with IR.
- True PA is evidenced by the following: Equal concavity shapes are on each side of the shafts of the proximal metacarpals; near equal distances exist among the proximal metacarpals; separation of the distal radius and ulna is present, except for possible minimal superimposition at the distal radioulnar joint.
- Soft tissue and bony trabeculation should be visible.
Positioning for PA oblique projection of wrist
- Seat the patient at the end of the radiographic table, placing the axilla in contact with the table.
- Rest the palmar surface of the wrist on the cassette.
- Adjust the cassette so that its center point is under the scaphoid when the wrist is rotated from the pronated position.
- From the pronated position, rotate the wrist laterally (externally) until it forms an angle of approximately 45° with the plane of the cassette.
- To ensure duplication in follow-up examinations, place a 45° foam wedge under the elevated side of the wrist.
- Extend the wrist slightly, and if the digits do not touch the table, support them in place.
- When the scaphoid is under examination, adjust the wrist in ulnar deviation. Place a sandbag across the forearm.
- CR: Perpendicular to the midcarpal area, it enters just distal to the radius.
Evaluation criteria
- Distal radius, ulna, carpals, and at least the midmetacarpal area should be visible.
- The trapezium and scaphoid should be well visualized, with only slight superimposition of other carpals on their medial aspects.
- Long axis of the hand, wrist, and forearm should be aligned with the IR.
- 45° oblique of the wrist should be evident by ulnar head being partially superimposed by distal radius.
- The proximal third, fourth, and fifth metacarpals should appear mostly superimposed.
- Soft tissue and bony trabeculation should be visible
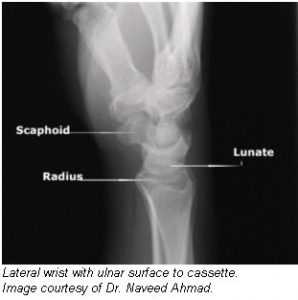
Positioning for lateral projection
- Seat the patient at the end of the radiographic table.
- Have the patient rest the arm and forearm on the table to ensure that the wrist is in a lateral position.
- Have the patient flex the elbow 90° to rotate the ulna to the lateral position.
- Center the cassette to the carpals, and adjust the forearm and hand so that the wrist is in a true-lateral position.
- CR: Perpendicular to the wrist joint.
Evaluation criteria
- Distal radius and ulna, carpals, and at least the midmetacarpal area should be visible.
- Long axis of the hand, wrist, and forearm should be aligned with long axis of IR.
- True-lateral position is evidenced by the following: Ulnar head should be superimposed over distal radius; proximal second through fifth metacarpals all should appear aligned and superimposed.
- Soft tissue and bony trabeculation should be visible.
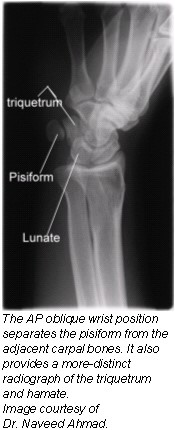
Positioning for AP oblique wrist projection (medial rotation)
- Place the cassette under the wrist and center it at the dorsal surface of the wrist.
- Rotate the wrist medially (intimally) until it forms a semisupinated position of approximately 45° to the cassette.
- CR: Perpendicular to the midcarpal area, it enters the anterior surface of the wrist midway between its medial and lateral borders.
Evaluation criteria
- Carpals on medial side of wrist.
- Triquetrum, hamate, and pisiform free of superimposition and in profile.
- Distal radius and ulna, carpals, and proximal half of metacarpals.
- Soft tissue and bony trabeculation should be visible.
Positioning for PA projection wrist with ulnar deviation (flexion)
- Position the wrist on the cassette for a PA projection.
- With one hand cupped over the joint to hold it in position, move the elbow away from the patient’s body and then turn the hand outward until the wrist is in extreme ulnar deviation.
Positioning for PA projection wrist with radial deviation (flexion)
- Position the wrist on the cassette for a PA projection.
- Cup one hand over the wrist joint to hold it in position. Then move the hand medially until the wrist is in extreme radial deviation.
- CR: Perpendicular to the midcarpal area.
- Radial deviation opens the interspaces between the carpals on the medial side of the wrist.
Evaluation criteria
- Carpals and their articulations should be on the medial side of the wrist.
- No rotation of wrist is evidenced by appearance of the distal radius and ulna.
- Extreme radial deviation should be clearly demonstrated, as revealed by the angle formed between longitudinal axes of forearm compared to the longitudinal axes of the metacarpals.
- Soft tissue and bony trabeculation should be visible.
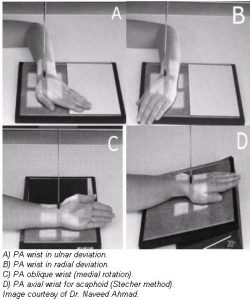
Positioning for scaphoid carpal bone (PA wrist axial projection)
- Place one end of the cassette on a support and adjust it so that the finger end is elevated 20° (this angulation of the wrist places the scaphoid at right angles to the CR so that it is projected without self-superimposition).
- Adjust the wrist on the cassette for a PA projection, and center the wrist to the cassette.
- CR: Perpendicular to the table and directed to enter the scaphoid.
Evaluation criteria
- Scaphoid should be clearly visible.
- No rotation of carpals, metacarpals, radius, or ulna.
- Distal radius and ulna, carpals, and proximal half of the metacarpals should be demonstrated.
- Soft tissue and bony trabeculation should be visible.
By Dr. Naveed Ahmad
October 15, 2002
Reprinted with permission of AuntMinnie.com. Copyright 2016.
Results
In the case of an emergency (a broken wrist, for example), most modern X-ray machines are able to display results instantly. When reading the image, keep in mind that bones and other dense objects show up white, while soft tissues are gray, and spaces between joints are black. If the results are not urgent and the purpose of the X-ray is to reveal and understand growth patterns, the results may be read within one to two days.
References:
Roth, Erica. “Gimme Five: Hand X-Rays.” Healthline. N.p., 18 July 2015. Web. 02 Feb. 2016. <http://www.healthline.com/health/hand-x-ray#Overview1>.
Waters, Hannah. “The First X-ray, 1895.” The Scientist. N.p., 1 July 2011. Web. <http://www.the-scientist.com/?articles.view/articleNo/30693/title/The-First-X-ray–1895/>.
Ahmad, Naveed. “The Twists and Turns of Hand and Wrist X-ray Positioning.” Aunt Minnie. N.p., 12 Oct. 2002. Web. <http://www.auntminnie.com/index.aspx?sec=ser&sub=def&pag=dis&ItemID=56361>.
Weiss, N. (2014, July 1). Hand X-Ray [Video file]. Retrieved from https://www.youtube.com/watch?v=Z0C4qib-pXE

