Baxter RENTALCONDITION - Pump Infusion Baxter 6201 Pre-Owned Ea

FloGard 6201 - Fully Refurbished (1-Year Warranty)
The Flo-Gard 6201 Volumetric Infusion Pump from Baxter can deliver a wide variety of fluids over a broad range of infusion rate. Enhanced safety, greater convenience and versatility, and Baxter standard IV administration sets that eliminate the need for costly disposable sets and reduce the potential for waste make the Flo-Gard 6201 the perfect infusion pump.
The Flo-Gard 6201 Volumetric Infusion Pump from Baxter can deliver a wide variety of fluids over a broad range of infusion rates. Its features include:
- Uses only standard Baxter solution administration sets.
- Configurable settings allow the pump to be customtailored to best suit the hospital's needs.
- Computer control capability allows remote control or monitoring of the Flo-Gard 6201 pump via a standard RS232-C interface.
- Pumps a wide variety of fluids, including blood and fat emulsions.
- Suitable for use in epidural administration.
- Safety clamp automatically occludes the tubing when the pump door is opened.
- Occlusion sensors detect both upstream and downstream restrictions. Sensitivity of the downstream occlusion sensor is selectable through the pump's configuration.
- Flow check display shows resistance to flow.
- Ultrasonic air-in-line detector. Sensitivity of the air detector is selectable through the pump's configuration.
- The Programmed Delivery Profile (PDP) enables manual programming or ramped calculation of up to 10 sequential infusion programs for situations where multiple flow rates are indicated.
- Slide clamp loading option provides flow shutoff when I.V. set is removed from the pump.
- Locking control panel helps prevent patient tampering.
6201 Flogard Specifications
| Equipment Category | Infusion Pump |
| Mounting/Use | Pole-Mounted |
| Therapy Type | Large Volume |
| Dimensions | 7.9" x 5.1" x 11.4" |
| Weight | 11.6 lbs. |
| Rate Range | 0.1 - 1999 ml/hr |
| Volume Range | 0.1 - 9999 ml |
| JCAHO Free Flow Compliant (Yes/No) | Yes |
| Tubing Type | Standard Baxter Tubing |
Physical Description

| Front Panel | |
| ITEM | FUNCTION |
| 1. Message display | Shows all alarm and alert messages. |
| 2. BACK LIGHT key | Backlights the displays when pressed. Pressing the key again turns the backlight off. If the pump is running on battery power, the backlight remains on for 60 seconds each time theBACK LIGHTkey is pressed. |
| 3. SILENCE key | Temporarily silences an audible alarm or alert for two minutes, unless another alarm occurs within the two minute silence period. All messages remain displayed until the cause of the alarm or alert is alleviated. |
| 4. NEXT legend | Lights when the TOT VOL/STATUS key is functioning as the NEXT key. |
| 5. TOT VOL/STATUS key | Displays total volume delivered when pressed. The key is also used to advance to the next step when programming a delivery profile. (SeeNEXTlegend, item 4 above.) |
| 6. CLEAR TOT VOL key | Resets the total volume delivered to zero when the pump is stopped |
| 7. TIME key | Enters the time over which an infusion is to take place during Volume-Time programming. |
| 8. STOP key | Stops the pump until further instructions are given. The messageSTOPPEDappears when the key is pressed. An alert will sound if the pump is stopped for more than two minutes. Clears all programming alerts while pump is running. |
| 9. Door latch | Opens and closes pump door for I.V. set loading and removal. |
| 10. ON-OFF/CHARGE key | Turns pump on and off. The internal battery charger remains on regardless of theON-OFF/CHARGEkey as long as the pump is plugged in. |
| 11. Battery icon | Lights when the pump is operating on battery power. |
| 12. Plug icon | Always lit when pump is plugged in and battery is charging. |
| 13. MONITOR legend | Lights when the pump is being monitored by a computer. |
| 14. COMPUTER CONTROL legend | Lights when the pump is being controlled by a computer. |
| 15. SEC START key | Starts the delivery of the secondary solution. |
| 16. SEC VTBI key | Allows programming of the secondary VTBI. |
| 17. OPTIONS key | Allows a computer to control the pump and permits use of the Programmed Delivery Profile (PDP). If Computer Control and/or PDP are available, theOPTIONSkey is lit. |
| 18. SEC RATE key | Allows programming of the secondary infusion rate. |
| 19. CLR key | Clears any programming values currently being entered. |
| 20. Numerical keypad | Programming values and decimal point are entered with these keys |
| 21. PRI VTBI key | Allows programming of the primary VTBI. |
| 22. PRI RATE key | Allows programming of the primary infusion rate. |
| 23. PRI START key | Starts the primary infusion |
| 24. Main display | Shows rate, volume to be infused (VTBI) and total volume infused for primary and secondary infusion programs. The decimal point is displayed as an underscore (example: 99_9). |
| 25.ALARMLED | Red LED that blinks during an alarm, accompanied by a message display and a repeated sequence of three tones. An alarm indicates that the pump requires immediate attention. |
| 26. PUMPING LED | Green LED which is constantly lit during pumping. |
| 27. ALERT LED | Yellow LED illuminates during alert conditions, accompanied by a message display and a repeated single tone. An alert indicates that the pump needs timely attention. |

| Pump Head Features | |
| ITEM | FUNCTION |
| 1. Upstream occlusion sensor | Detects a complete tubing restriction upstream of the pump |
| 2. Pumping fingers | The linear peristaltic pump mechanism consists of cam-driven pumping fingers which successively manipulate the tubing against the backplate, resulting in fluid movement in a downward direction. |
| 3. Downstream occlusion sensor | Detects tubing restrictions downstream of the pump. The sensitivity level can be adjusted to suit the needs of the hospital through the pump's configuration. |
| 4. Air sensor | Detects air bubbles in the tubing. The sensitivity is adjustable via the pump's configuration. |
| 5. Safety clamp | Prevents accidental fluid flow by automatically occluding the tubing whenever the pump door is opened. |
| 6. Slide clamp slot | When the slide clamp loading option is enabled, the I.V. set's slide clamp must be inserted into this slot. The operator must push the slide clamp into the slot to occlude the tubing before the I.V. set can be removed from the pump. The slide clamp loading option is selectable through the configuration. |
| 7. Slide clamp spring retainer | If your hospital has not selected the slide clamp loading option, this spring retainer will be inserted into the slide clamp slot, preventing the insertion of the slide clamp into the slot. |
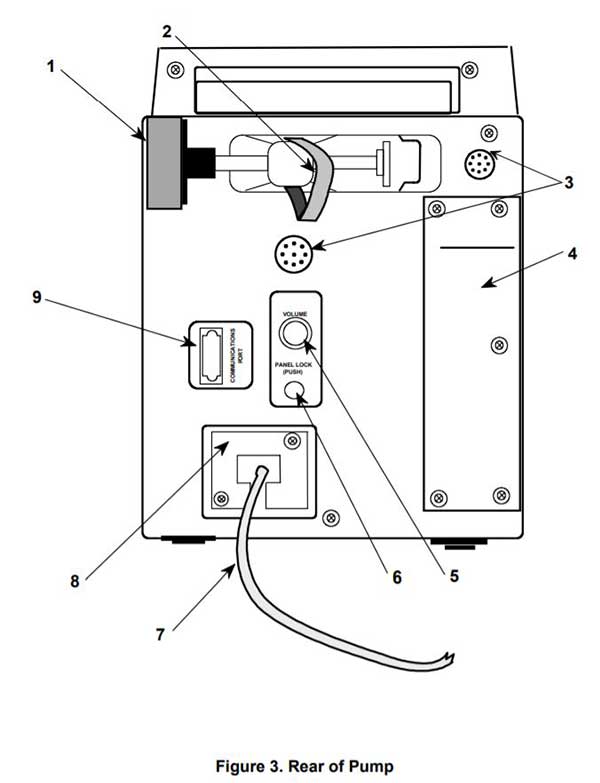
| Rear Panel Features | |
| ITEM | FUNCTION |
| 1. I.V. pole clamp | Secures the pump to the I.V. pole |
| 2. Power cord strap | Stores the power cord |
| 3. Audio speakers | For generation of alarm and alert tones |
| 4. Battery compartment | Allows access to the battery by authorized service personnel only. |
| 5. VOLUME knob | Adjusts volume of alert and alarm tones. The alarm and alert tones cannot be turned completely off. |
| 6. PANEL LOCK switch | Disables all front panel keys exceptBACK LIGHTandTOT VOL/STATUSwhen pressed. |
| 7. Power cord | Supplies AC power to the pump when plugged into hospital-grade earth-grounded outlet. Removable by authorized service personnel only. |
| 8. Fuse | Fuse compartment is located behind power cord retention strain relief plate. |
| 9. COMMUNICATIONS PORT | Standard RS-232C port that allows the pump to communicate with a computer. |
Tips to Avoid Nuisance Alarms
Tip #1: To Ensure Door is Closed Correctly
You should hear 2 clicks when closing the door.
- The metal pin pushing in (part of the slide clamp assembly)
- The blue clip "popping" out
Tip #2: To Avoid Occlusion Alarm/Pinched Tubing
If you heard 2 clicks after closing the door (so you know the clip popped out successfully), you can also gently tug the tubing that is coming out at the bottom, down and away from you, toward the back of the pump.

(See arrow for where to tug tubing.)
This will ensure an occlusion was not created when closing the door and will also make sure the tubing isnt being pinched at all by the clip.
Tip #3: To Avoid Nuisance Occlusion Alarms
If youve been using the tubing for a while, try using a fresh section of the tubing by moving the clip down and loading this new section of tubing.
Tip #4: To Avoid Nuisance Occlusion Alarms
Occasionally the occlusion sensors get "sticky." Pushing on the occlusion sensors often loosens them back up. (See illustrations 1 & 2)
Tip #5: To Avoid Tubing Misload Alarms and Potential for Cut Tubing
When installing the tubing, run your finger from the point where the clip is installed all the way up to the top. This will ensure the tubing is fully inserted into the sensors. See illustration 1.