Product Description
Cook Medical G09709 - SET, STENT, ULTRA, UTSSW-8.5-24-AMP-RH, EACH
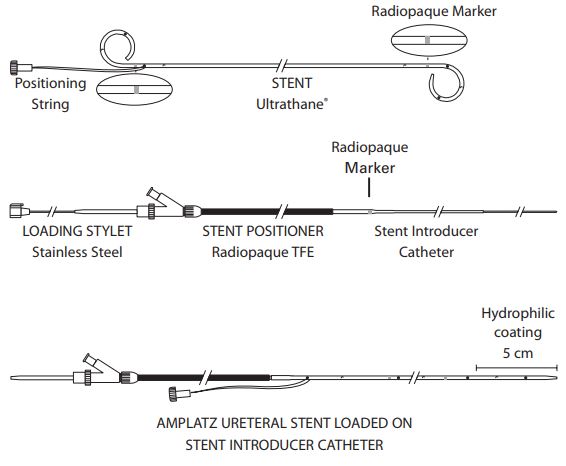
Amplatz Ureteral Stent Set
The Amplatz Ureteral Stent Set consists of an ultrathane stent with positioning string and radiopaque marker, and a stent positioner with stent introducer catheter and loading stylet.
| Order Number | Reference Part Number | Stent (Fr) | Stent Length (cm) | Stent Sideports | Accepts Wire Guide Diameter |
| G09709 | UTSSW-8.5-24-AMP-RH | 8.5 | 24 | 6 | 0.035 |
Features and Benefits
- The radiopaque bands, located just proximal to the pigtails, help to accurately position the stent.
- The hydrophilic coating, when activated, becomes very lubricious, reducing friction during stent insertion.
- Ultrathane material enhances patient comfort and allows the device to be used safely with ethyl alcohol.
Components
- Amplatz Ureteral Stent
- Loading stylet
- Stent introducer catheter
- Stent positioner
Intended Use
The Amplatz Ureteral Stent is intended for internal drainage of urine.
Precautions
- The product is intended for use by physicians trained and experienced in diagnostic and interventional techniques. Standard techniques for placement of ureteral stents should be employed.
- Do not over-advance ureteral stent onto stent positioner. Crimping of stent could occur.
- The potential effects of phthalates on pregnant/nursing women or children have not been fully characterized and there may be concern for reproductive and developmental effects.
Instructions for Use
- Using standard percutaneous access technique, establish wire guide position well into the bladder.
- Load the non-tapered proximal end of the ureteral stent onto the distal end of the pre-assembled stent introducer.
- Holding the loading stylet beyond the tapered end of the ureteral stent introducer, lightly grasp the stent itself and begin advancing the non-tapered proximal end of the stent onto the pre-assembled stent introducer. Advance the stent until its proximal end aligns with the radiopaque marker on the stent introducer catheter. (Fig. 1)
- Remove the loading stylet from the pre-assembled stent introducer. The loading stylet is not to be used for introduction of ureteral stent into the patient.
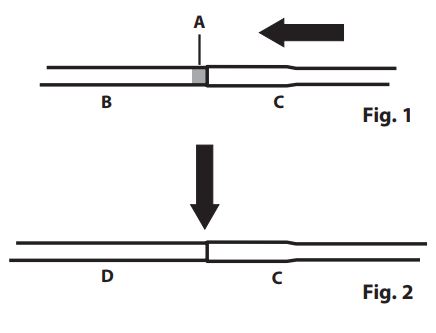
- Loosen the Tuohy-Borst adapter and position the distal end of the stent positioner so that it abuts the proximal end of the ureteral stent at the radiopaque marker. (Fig. 2) Retighten the Tuohy-Borst adapter.
- Activate the hydrophilic coating by wetting the surface of the device with sterile water or saline. For best results, maintain wetted condition of the device during placement. The Ureteral stent is now ready for introduction.
- Introduce the loaded, pre-assembled stent introducer over the wire guide through the ureter into the bladder. Final position of the ureteral stent, prior to actual placement should be verified by fluoroscopy or radiography.
- To release the stent for final placement;
- Loosen the Tuohy-Borst adapter
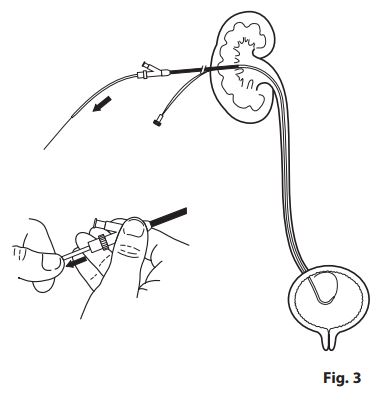
- Holding the sidearm fitting of the stent positioner to prevent inadvertent advancement of the stent, slowly pull back and remove the stent introducer catheter from the stent positioner. (Fig. 3) The Ureteral stent is now positioned at its predetermined site.
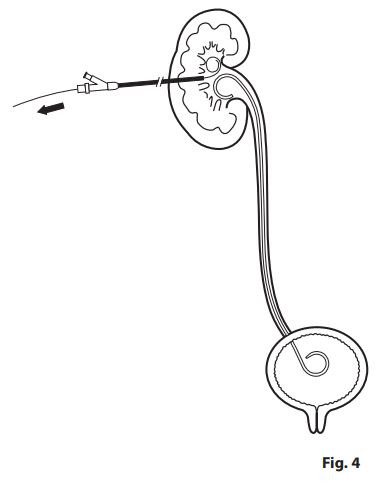
NOTE: Do not advance the stent positioning catheter. Doing so will advance the ureteral stent. - Carefully withdraw the wire guide from the ureteral stent, but not completely from the collecting system. This will allow the ureteral stent to resume its double "J" shape. (Fig. 4)
- Cut the string and remove. The wire guide can now be advanced further into the renal pelvis. NOTE: If the string cannot be easily removed, tie an additional length of string to the cut string, then advance an appropriately sized dilator over the string. While the dilator holds the stent in place, slowly remove the string.
- Remove the stent positioner and place a small, temporary drainage catheter over the wire guide into the collecting system. The wire guide can now be removed.
How Supplied
Supplied sterilized by ethylene oxide gas in peel-open packages. Intended for one-time use. Sterile if package is unopened or undamaged. Do not use the product if there is doubt as to whether the product is sterile. Store in a dark, dry, cool place. Avoid extended exposure to light. Upon removal from package, inspect the product to ensure no damage has occurred.
CAUTION: U.S. federal law restricts this device to sale by or on the order of a physician or properly licensed practitioner.