Cook Medical G35129 - DEVICE, DUETTE, MULT-BND, MUCOSCTMY, DT-6-5F, EACH
Duette Multi-Band Mucosectomy
The device consists of two complementary components: a banding device for creation of the pseudopolyp and a monopolar electrosurgical snare used in conjunction with an electrosurgical unit to remove the pseudopolyp using electrocautery. The banding component is supplied non sterile. The snare is supplied sterile.
Used for endoscopic mucosal resection in the upper GI tract. The snare component is supplied sterile and the banding component is supplied non-sterile. Intended for single use only.
- Easy set-up, similar to Saeed Six-Shooter Multi-Band Ligator
- Six latex rubber bands for resection of large lesions
- Soft, mini-hexagonal, braided snare cuts cleanly and has excellent shape retention even with repeated resections
- Snare available in 5 FR and 7 FR sizes
- Snare may be passed through ligator handle allowing for speedy resection of ligated tissue without removal of endoscope or disassembly of components
| Order Number | Reference Part Number | Endoscope Outer Diameter (mm) | Number of Bands | Sheath Size Fr | Snare Size (cm) | Minimum Accessory Channel (mm) |
| G35129 | DT-6-5F | 9.5 - 13 | 6 | 5.0 | 1.5 x 2.5 | 2.8 |
NOTES
This device is designed for single use only. Attempts to reprocess, resterilize, and/or reuse may lead to device failure and/or transmission of disease. If the package is opened or damaged when received, do not use. Visually inspect with particular attention to kinks, bends and breaks. If an abnormality is detected that would prohibit proper working condition, do not use. Notify Cook for return authorization. Do not use this device for any purpose other than stated intended use. This device must be stored in a dry location, away from temperature extremes.
Intended Use
This device is for endoscopic mucosal resection in the upper GI tract. This device is intended for single use only.
Contraindications
Contraindications include those specific to the primary endoscopic procedure to be performed in gaining access to the desired site for mucosal resection. Contraindications specific to esophageal banding include, but are not limited to: cricopharyngeal or esophageal narrowing or stricture, tortuous esophagus, esophageal varices, diverticula, known or suspected esophageal perforation, asymptomatic rings or webs, coagulopathy. Contraindications to upper GI electrosurgical resection include, but are not limited to: coagulopathy.
Potential Complications
Potential complications associated with EMR include, but are not limited to: retrosternal pain, nausea, laryngeal laceration, esophageal perforation, stricture formation, obstruction, haemorrhage.
Precautions
Refer to the package label for the minimum channel size required for this device. The Duette Multi-Band Mucosectomy device should only be used by, or under the supervision of, physicians thoroughly trained in therapeutic endoscopy and mucosal resection. The snare component of the Duette meets the recognized standard for high frequency electrosurgical leakage current (ANSI/AAMI HF 18). Before using this device, follow the recommendations provided by the electrosurgical unit manufacturer to ensure patient safety through the proper placement and utilization of the patient return electrode. Ensure a proper path from the patient return electrode to the electrosurgical unit is maintained throughout the procedure.
Component Parts
- Barrel with preloaded Bands & attached Trigger Cord
- Multi-Band Ligator Handle
- Loading Catheter
- Irrigation Adapter
- Soft, Braided mini-hexagonal snare
System Preparation - Multi-Band Ligator
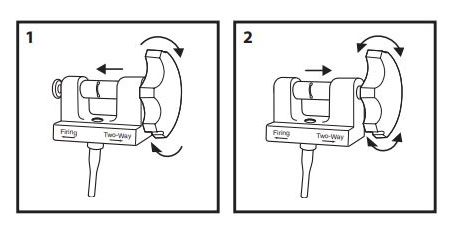
- Examine the features of the Multi-Band Ligator handle. The handle has two positions, which control rotation. The firing position (Fig. 1) allows the handle to be rotated in the forward direction only. The two-way position (Fig. 2) allows the handle to rotate in both directions. Prior to introducing the endoscope, keep the handle in the two-way position.
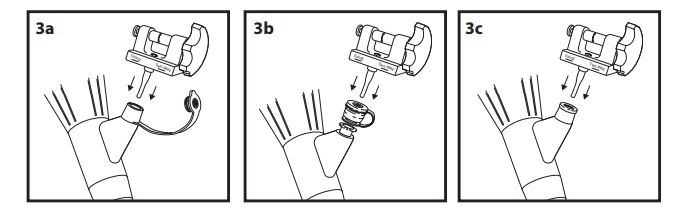
- Insert the Multi-Band Ligator handle into the endoscope accessory channel following the instructions below for the appropriate endoscope. Olympus - (see Fig. 3a), Pentax - (see Fig. 3b), Fujinon - (see Fig. 3c).
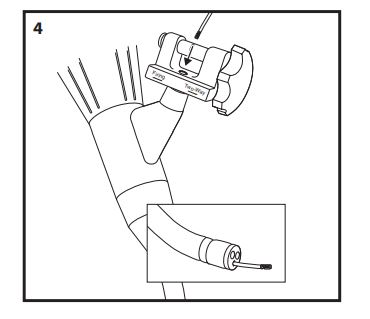
- Introduce the loading catheter through the white seal in the Multi-Band Ligator handle and advance, in short increments, until it exits the tip of the endoscope (Fig. 4).
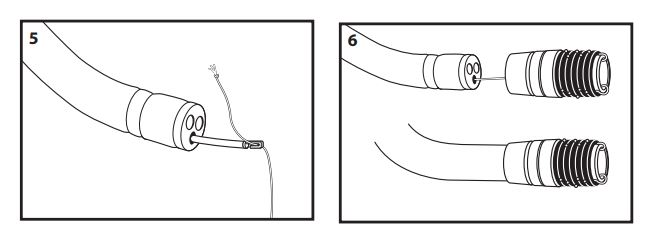
- Attach the trigger cord to the hook on the end of the loading catheter, leaving approximately 2 cm of trigger cord between the knot and the hook (Fig. 5). Withdraw the loading catheter and trigger cord up through the endoscope and out through the Multi-Band Ligator handle. Dispose of the loading catheter per institutional guidelines for biohazardous medical waste.
- Attach the barrel to the tip of the endoscope, ensuring the barrel is advanced onto the tip as far as possible (Fig. 6).
- With the endoscope tip straight, place the trigger cord into the slot on the spool of the Multi-Band Ligator handle (Fig. 7a) and pull down until the knot is seated in the hole of the slot (Fig. 7b).
Note: The knot must be seated into the hole or the handle will not function properly.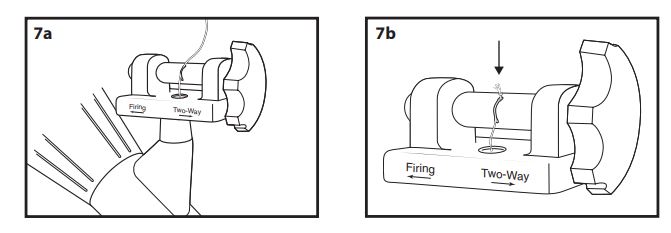
- With the Multi-Band Ligator handle in the two-way position, slowly rotate the handle clockwise to wind the trigger cord onto the handle spool until it is taut (fig. 8).
Note: Care must be taken to avoid deploying a band while winding the trigger cord.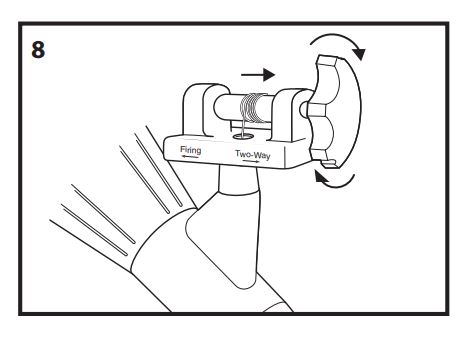
- Check the endoscopic view. To maximize visualization, the position of the trigger cord may be altered by rotating the barrel.
Note: The endoscopic view broadens after each band deployment.
System Preparation - Snare
- Fully retract and extend the snare to confirm smooth operation of the device.
- Slide the adjustable marker, located in the handle shaft, to establish a reference point indicating full retraction of the snare into the sheath. The grid on the handle may be used to set up reference points, establishing the thickness of the tissue being excised during the procedure, thereby reducing the possibility of premature guillotining of the pseudopolyp. To utilize these markings, fully advance and retract the snare to establish the markings which indicate snare position for the configuration being used (Fig 11).

Instructions for Resection Of Mucosa By Band Ligation
- Lubricate the endoscope and exterior portion of the barrel.
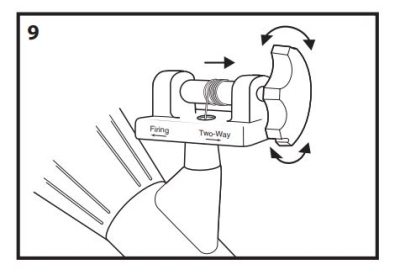
Caution: Do not place lubricant inside the barrel. Caution: Do not apply alcohol to the device. - With the Multi-Band Ligator handle in the two-way position, introduce the endoscope into the esophagus (Fig. 9). After intubation, place the handle in the firing position (Fig. 10).

- Visualize the selected area of mucosa to be resected and aspirate it into the barrel.
Caution: Prior to deployment, ensure the endoscopists hand is positioned on the handle of the Multi-Band Ligator rather than the endoscope controls. - Maintain suction and deploy the band by rotating the Multi-Band Ligator handle clockwise until band release is felt, indicating deployment (Fig. 10) as above.
Note: If the band will not deploy, place the handle in the two-way position and loosen the trigger cord slightly. Place the handle in the firing position and continue with the procedure. - Release the suction button of the endoscope, insufflate air, then withdraw the scope slightly to release the ligated pseudopolyp.
Note: An irrigation adapter is provided with each Multi-Band Ligator. If irrigation of the endoscope accessory channel is desired to clear the viewing field, attach the adapter to a syringe filled with sterile water and insert into the white seal of the handle. Irrigate as necessary (Fig. 10) as above. - With the pseudopolyp in the endoscopic view, introduce the sheath and retracted snare into the white seal of the handle of the Multi-Band Ligator.
- Advance the device, in small increments, until it is endoscopically viewed exiting the endoscope.
- Advance the snare wire out of the sheath and position it around the pseudopolyp to be removed. The snare may be placed either above or below the band.
- Following the electrosurgical unit manufacturers instructions for settings, verify the desired settings and activate the electrosurgical unit.
Note: The maximum rated input voltage for this snare is 2 kilovolts peak-to-peak for cut mode and 5 kilovolts peak-to-peak for coagulation mode. - Proceed with resection of the pseudopolyp.
- Following resection of the pseudopolyp turn the electrosurgical unit off. Retract the snare from the endoscope while the next pseudopolyp is created.
- Repeat the process of pseudopolyp creation as needed in order to remove as much of the mucosa as desired.
- Following each pseudopolyp resection, if tissue retrieval is desired, follow standard institutional guidelines.
Dissassembly Of The Components From The Endoscope
- Upon completion of the procedure, disconnect the active cord from the Snare handle and dispose of the Snare according to institutional guidelines for biohazardous medical waste.
- Disconnect the active cord from the electrosurgical unit. Wipe the active cord with a damp cloth to remove all foreign matter. Store in a loose coil.
Note: Wrapping the active cord tightly may damage the device. - Remove the endoscope from the patient.
- Dismantle the Multi-Band Ligator as follows.
- Dispose of the remaining components according to institutional guidelines for biohazardous medical waste.
- Remove the handle and attached trigger cord from the accessory channel.
- Remove the barrel from the endoscope tip.
If any unfired bands remain on the barrel:
- Place the handle in the two-way position.
- Loosen the trigger cord from the spool, then remove the handle from the accessory channel cap.
- Detach the trigger cord from the handle slot.
- Remove the barrel from the endoscope tip, then pull the trigger cord through the channel and out the endoscope tip.