Cook Medical G56403 - SET, FLOW 20, PERC, ENDO, GASTRO, PULL, EACH
Flow 20 Push Method
Percutaneous Endoscopic Gastrostomy System
Used for percutaneous endoscopic placement to provide enteral nutrition to patients requiring nutritional support. Supplied sterile and is disposable - intended for single use only.
- Kit components, including hemostat and tube clamp, are conveniently packaged for sequential use during the procedure for increased efficiency
- Clear feeding tube - made of flexible, high-grade medical silicone is optimal length to give physician control throughout placement
- Sharper scissors provide for a better cut during the placement procedure
- Reference "X mark" to specify where to cut
| Order Number | Reference Part Number | Feeding Tube Fr | Feeding Tube InnerDiameter (mm) | Insertion WireDiameter (inch) | Insertion WireLength (cm) |
| G56403 | FLOW-20-PULL-SSK-S-T* | 20 | 4.47 | n/a | 150 |
Gastrostomy Set Contents
- 1 Silicone Feeding Tube
- 1 Looped Insertion Wire
- 1 PrepTray
- 1 Bolster Kit
- 5 Gauze Pads
- 1 Drape
- 1 Instruction Manual
- 1 Patient Care Manual
- 1 Cold Snare
Prep. Tray Contents
- 1 Syringe
- 1 Pk. Antiseptic Swabsticks with Instruction
- 1 Needle Cannula
- 1 Pk. Antiseptic Ointment
- 1 22 gauge 11/2"Needle
- 2 Pks. Water Soluble Lubricant
- 1 #11 Scalpel
Bolster Kit Contents
- 1 Bolster
- 1 Twist Lock
- 1 Cable Tie
- 1 Pr. Scissors
- 1 Universal Adapter
- 1 Bolus Adapter
- Tubing Clamp
- Hemostats
Contraindications
Contraindications associated with placement and use of a PEG tube include, but are not limited to:sepsis,severe gastroesophageal reflux, ascites, or diffuse inflammatory, infectious, or neoplastic disease involving the walls of the abdomen or anteriorstomach, gastrointestinal obstruction or proximalsmall bowel fistulae.
Potential Complications
Potential complications associated with placement and use of a PEG tube include, but are not limited to: bronchopulmonary aspiration and pneumonia, respiratory distress or airway obstruction, peritonitis orseptic shock, colocutaneous, gastrocolocutaneous orsmall bowel fistula, gastric dilatation,sigmoid intra-abdominal herniation and volvulus, persistent fistula following PEG removal, esophageal injury, necrotizing fasciitis, candida cellulitis, improper placement or inability to place PEG tube, tube dislodgment or migration, hemorrhage, and tumor metastasis. Additional complicationsinclude, but are not limited to: pneumoperitoneum, peristomal wound infection and purulent drainage,stomal leakage, bowel obstruction, gastroesophageal reflux (GERD), and blockage or deterioration of the PEG tube. Note: Patients with cirrhosis have an increased risk of developing ascites which is a contraindication to PEG placement.
Precautions
- The benefit of a PEG tube to the patient must be weighed against the risks associated with any indwelling gastrostomy feeding tube.
- During placement and use, care must be taken to avoid cutting, crimping, or damaging components.
- Do not modify the PEG tube or adaptersin any way.
- Follow the instructions and the Patient Care Manualsupplied with each kit. It is essential for the Patient Care Manual to accompany the patient and be explained to all people responsible for the care of the patient.
- The PEG system isradiopaque. Proper location and integrity of any internal component can be visualized by x-ray.
- Manufacturer guidelines are not intended to replace physicians recommendations.
- A thorough understanding of the technical principles, clinical applications and risks associated with placement and/or removal of a PEG tube is necessary before using this device. Placement and/or removal of the PEG tube should only be performed by, or under the supervision of, physiciansthoroughly trained in the procedure.
- When placing a PEG tube in obese patients, all anatomicalstructures must be identified prior to placement.
- When placing a PEG tube, observe all institutional guidelinesregarding gastroscopy, including removal of dentures.
- PEG replacement isrecommended every three months or at the discretion of the physician.
Instructions for Use
Tube Placement
- Upon removing the device and its componentsfrom the package, visually inspect with particular attention to kinks, bends or breaksin the feeding tube assembly. If an abnormality is detected that would prohibit proper working condition, do not use. Please notify Cook for return authorization.
- After introducing the gastroscope, insufflate the stomach and examine the mucosa. Determine if the mucosa isfree of ulcerations or bleeding before proceeding.
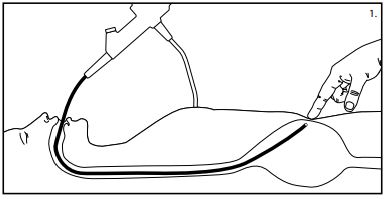
- Position the tip of the gastroscope and illuminate the left anterior wall of the stomach.
Note: It may be necessary to dim the lightsin the procedure room to better visualize the light through the abdominal wall. Important: Ideally, placement of the PEG should be low in the body of the stomach or high in the antrum towardsthe pylorusto allow for easier insertion of the PEG-J(jejunal) feeding tube into the PEG, if indicated as an option. - Manipulate the gastroscope tip until the light trans-illuminatesthe desired PEG position. (See fig. 1)
- Lightly depressthe illuminated area with a finger while viewing the site with the gastroscope. The depression of this area should be clearly visualized with the scope. After determining that the mucosa is healthy, proceed with this procedure.
- Prepare the site following surgical guidelines as determined by your institution. Drape the area using the enclosed surgical drape. Inject local anesthetic (not included) into the PEG site.
- Using the enclosed scalpel, make a 1 cm long incision through the skin,subcutaneous tissue.
Caution: A smaller incision may contribute to extreme resistance of the gastrostomy feeding tube when exiting the fascia. - Endoscopically observe the site
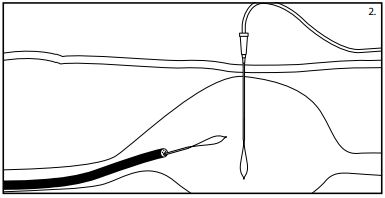
- While maintaining stomach insufflation, insert the needle and cannula unit through the skin incision and into the stomach. Leave the cannula in place to maintain accessto the stomach while removing the inner needle.
- Place the looped insertion wire through the needle cannula and into the stomach. (See fig. 2)
- Maintain stomach insufflation to obtain close proximity of the stomach and abdominal walls. Place a snare or non-spiked biopsy forcepsthrough the channel of the gastroscope and grasp the looped end of the wire.
Caution: Do not tighten the snare around the needle cannula after removal of the innerstylet asthis may interfere with passage of the wire loop. - While maintaining the snare or non-spiked biopsy forcepssecurely around the looped insertion wire, remove the gastroscope and the wire from the patients mouth. (See fig. 3) The insertion wire will now be protruding from both the patients mouth and incision site.

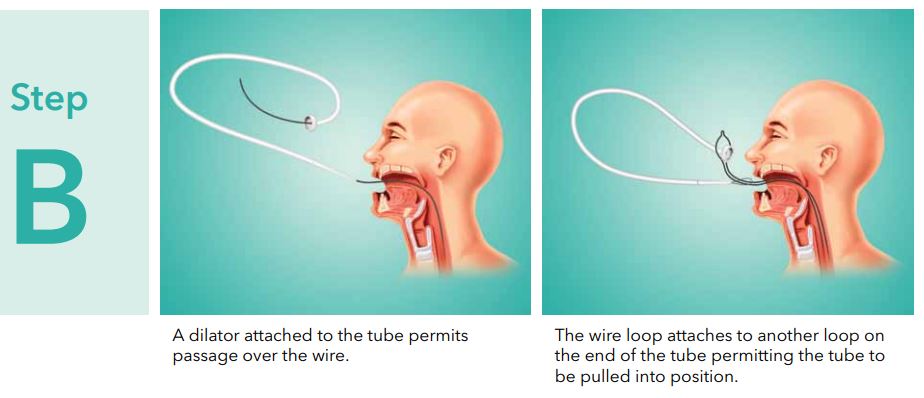
- Passthe insertion wire loop through the looped wire on the dilator end of the feeding tube. (See fig. 4)
- Place the internal bumper of the feeding tube through the extended insertion wire loop. (See fig. 4)
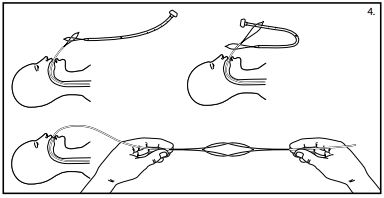
- Pull the feeding tube gently through the insertion wire loop and form a knotless connection by applying simultaneous gentle traction on both wire loops. (See fig. 4)
- Using water-soluble lubricant and gauze,thoroughly lubricate the dilator and entire external length of the tube including the internal bumper.
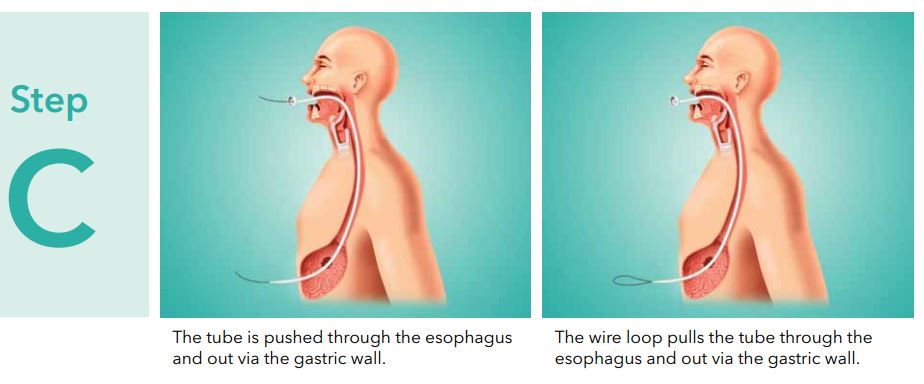
- Advance the dilator tip through the patients mouth by pulling on the wire exiting the abdominal incision. Depression of the patientstongue may facilitate the initial introduction of the feeding tube. Gentle pressure on eitherside of the incision may prevent excessive pulling on the incision site.
- Continue to pull the insertion wire until the dilator protrudesthrough the abdominal wall.
Note: The tube is extra long to permit control of the insertion set at all times.
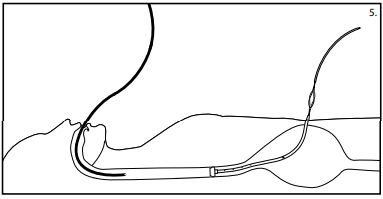
Caution: Do not push the tube from the oral portion asthis may result in the tube curling in the patientsstomach. - When the internal bumper of the PEG tube entersthe mouth, reintroduce the gastroscope and view the tip asit advancesthrough the esophagus and into the stomach. (See fig. 5) Monitor the patient for respiratory distress as you advance the internal bumper through the esophagus.
- While observing centimeter increments,slowly pull the introduction dilator and tube through the abdominal incision. Bring the internal bumper in contact with the stomach wall, carefully avoiding excesstension.
- Apply gentle pressure to the exiting portion of the feeding tube.
Caution: Blanching of the site indicates excessive pressure on the mucosa and should be avoided. - Slide the bolster over the dilation catheter loop and onto the tube, past the X mark. The hemostats provided with the kit may be used to facilitate placement of the bolster over the PEG tube. Cut the tube at the X mark.
Note: Antiseptic ointment may be applied to the surrounding tissue prior to sliding the bolster into position.
Warning: The bolstershould sit close to the skin but not tight against the skin. Excessive traction on the tube may cause premature removal, fatigue, or failure of the device. (See fig. 6)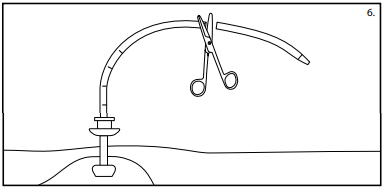
- Secure the twist lock or cable tie around the bolster collar, being careful not to crimp it.
Important: Use the twist lock or cable tie to secure the bolster to the tube. This will help to prevent future migration of the tube and reduce the need to constantly reposition or pull on the tube. - Cut off the excess length of the cable tie (if applicable) using the scissors provided.
- If desired,slide the tubing clamp onto the tube leaving a gap between bolster and tubing clamp.
- Plug in the adapter of choice (universal or bolus) and close the caps. (See fig. 7)
Note: The adapter may be secured to the tube with a cable tie.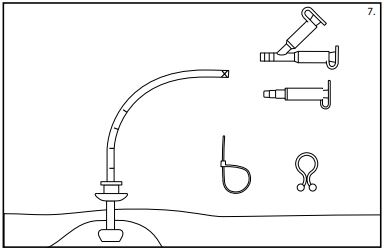
- Note the centimeter marking on the tube that is closest to the bolster and record it on the patients chart and on the patient information sheet in the Patient Care Manual.
Note: The Patient Care Manual enclosed in the kit isintended as a reference for the caregivers of the patient. It is essential for the Patient Care Manual to accompany the patient and be explained to all people responsible for the care of the patient. - Dispose of residual kit materials per institutional guidelinesfor biohazardous medical waste.
- Record physiciansinstructionsfor feeding and administration of prescribed medicationsin the Patient Care Manual.
- The patientshould remain NPO for 24 hours unless otherwise directed by a physician.
Tube Removal
The PEG tube has been designed for removal using the external/traction method shown below. If this method of removal is not possible, another method such as endoscopic orsurgicalshould be utilized.
Caution: If a replacement tube is desired, it must be placed immediately after removal. External tube removal may result in minimal trauma or bleeding that may require treatment.
External/Traction Method
The feeding tube may be removed without the need for endoscopy in the following manner:
- Grasp the gastric feeding tube near the stoma site. While slowly rotating the tube, gently push 1-2 cm of the tube into the stomach to separate the tube from the stoma tract.
Warning: If the tube does not rotate freely within the tract, do not attempt to use traction as a method of removal. - Hold the gastric tube near the stoma site and apply counter pressure by placing the fingers of the other hand around the base of the tube.
- Loosely cover the stoma site with either a towel or a drape.
- Holding the gastric feeding tube straight, apply steady traction to the tube until the internal dome emergesthrough the abdominal wall. Caution: The tube must be pulled straight out of the stoma tract.
- Dispose of the feeding tube per institutional guidelinesfor biohazardous medical waste. The stoma tractshould heal and close within 24 hours.
PEG Placement Techniques