Applied Medical Technology M1-1-2424-I - AMT 24 FR MiniONE Non-Balloon Button - ENFit Compatible, Stoma Length 2.4 cm, Each

The MiniONE Family of G-Tubes
The More Comfortable Alternative for Enteral Feeding
As a caregiver or patient, we believe you have a right to the most comfortable and reliable gastrostomy tubes, thats why we developed the MiniONE line of buttons. Whether you use our Balloon or Non-Balloon g-tube designs, we strive to provide the comfort and confidence you deserve, minimizing leaks, balloon breaks and granulation tissue.
As the Leader in Enteral Device Innovation, we were present at the birth and development of the Percutaneous Endoscopic Gastrostomy (PEG) movement. Our founder co-invented the very first low profile feeding device, often called a button g-tube, which we manufactured for distribution by others.
MiniONE Non-Balloon Button
The MiniONE Non-Balloon Button is a great alternative for patients who do not tolerate balloon devices. It uses a bolster system on the button shaft to hold the button in place, instead of a balloon. Its lower profile design is easier to conceal under clothing than other obtrusive g-tubes. Available in 14, 18, 20 and 24F with varying stoma length sizes ranging from 1.0cm through 4.4cm.
Non-Balloon Benefits:
- No balloon to fail
- Insertion/Removal tool distends bolster to smaller profile
- Internal bolster is smaller than a balloon (less likely to block the pylorus
- Internal dome provides more holes/openings for better feeding and venting
How the Capsule Non-Balloon Mini ONE Button is Different
The capsule design of the Capsule Non-Balloon Mini ONE Button offers advantages found nowhere else:
- No balloon to fail, so replacements occur less often
- Capsule design dramatically reduces pain during insertion
- Button shaft is as narrow as that of a balloon button, and the capsule is self-lubricating for easy insertion
- Easy to use pull-away tether releases capsule to deploy internal bolster
- For removal: Removal tool distends bolster to a smaller profile
- Ideal for people who dont tolerate balloon buttons
- Internal bolster is smaller than a balloon (less likely to block the pylorus)
- Internal dome provides more holes/openings for better feeding and venting
- Feeding sets are interchangeable with Balloon Mini ONE device
Why the Non-Balloon Option?
Extended LifeInternal silicone retention bolster may last much longer than balloon devices. | An AlternativeIdeal for patients who do not tolerate balloon buttons due to anatomy or differences in gastric environment. | Smaller BolsterA smaller internal bolster occupies less gastric space. |
MiniONE Balloon Button Anatomy
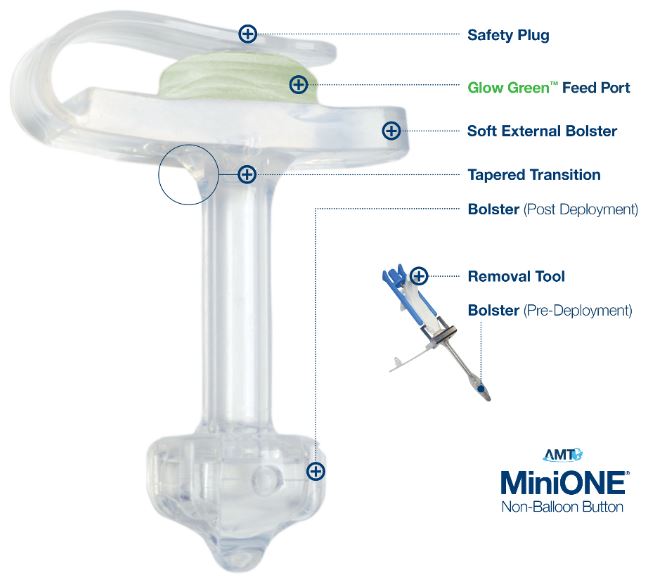
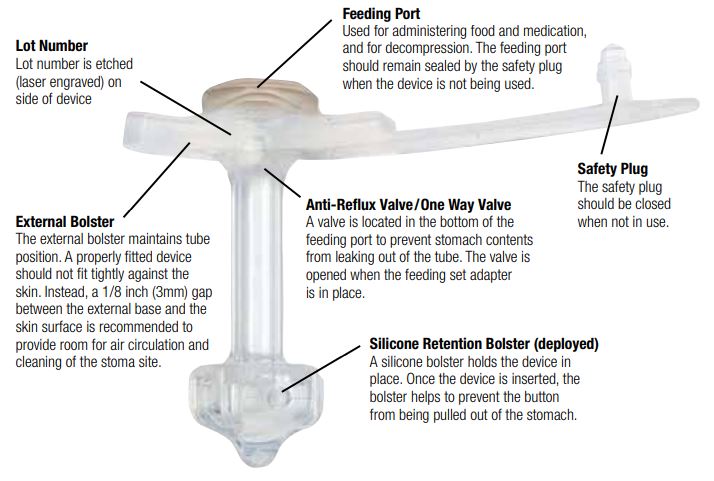
Components of the Non-Balloon MiniONE Button
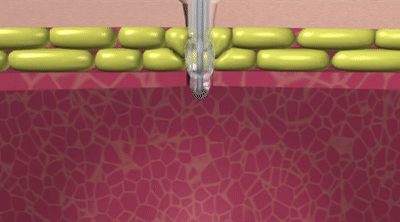
The Capsule Non-Balloon MiniONE Button is a silicone device that is inserted into a gastrostomy to provide direct access to the stomach for feeding, decompression, and medication.
Feeding with YourNon-Balloon Button
Verify Proper Non-Balloon MiniONE Button Placement & Functionality
Before feeding through the Non-Balloon MiniONE Button, it is important to verify proper placement inside the stomach as well as the functionality of the device.
- Connect the extension set that will be used for feeding.
- Draw 5 ml of water into syringe and attach it to the extension set.
- Pull back on the plunger until stomach fluid (normally yellow or clear unless there is food in the stomach) is observed in the tube.
- Flush the stomach contents from the device with the water in the syringe.
For all feeding methods it is recommended that the patient be fed with head up above heart and kept head up for at least 30 minutes after feeding.
Continuous Feeding
- Prime the tubing: Attach the feeding bag tubing to the right angle feeding set and clamp one or both tubes.
- Fill bag with formula. Unclamp tube(s) and allow formula to fill tubes. Re-clamp tubing.
- Connect feeding set to Mini ONE Button feeding port.
- Connect feeding bag tubing to the pump. Set flow rate. Unclamp tubes and begin feeding.
- When feeding is complete, clamp both feeding set tubing and feeding bag tubing. Disconnect feeding bag.
- Flush feeding set with prescribed amount of water (5ml for children, 10-20ml for adults).
- Disconnect feeding set and wash with warm soapy water.
Bolus Feeding using a catheter tip syringe:
- Prime the tubing: Attach a water filled catheter tip syringe to the bolus feeding set and fill with water. Clamp the feeding set.
- Connect feeding set to Mini ONE Button feeding port.
- Disconnect syringe from feeding set and remove syringe plunger. Reattach syringe without the plunger.
- Slowly pour formula into syringe and unclamp feeding set. Keep syringe filled with formula to prevent air from entering the stomach. To adjust feeding flow rate, raise or lower the syringe.
- When feeding is complete, flush the feeding set and button with the prescribed amount of water (5ml for children, 10-20ml for adults).
- After flushing, disconnect feeding set and wash with warm soapy water.
Bolus Feeding using a gravity drip bag:
- Prime the tubing: Attach the gravity bag tubing to the bolus feeding set and clamp one or both tubes.
- Fill bag with prescribed amount of formula. Unclamp tube(s) and allow formula to fill both tubes to purge the air. Re-clamp tubing.
- Connect the feeding set to the Mini ONE Button feeding port.
- Unclamp tube(s) to start feeding. Adjust the drip rate of the formula by adjusting the clamp pressure on the gravity bag tubing.
- When feeding is complete, clamp both feeding set and gravity bag tubing. Disconnect gravity bag.
- With a syringe, flush feeding set and button with prescribed amount of water (5ml for children, 10-20ml for adults).
- After flushing, disconnect feeding set and wash with warm soapy water.
What is ENFit
The International Organization for Standardization (ISO) has created a new standard design for enteral connectors, termed the "ENFit Connector."
These new ENFit Connectors are intended to improve patient safety and to decrease the risk of medical device misconnections. This new connector has been designed to be incompatible with Luer adapters, which are commonly used in IV applications. The ENFit connector will look & secure very similar to a Luer threaded lock system, although the design is larger and thus, incompatible with Luers.
Why ENFit?
ENFit is a patient safety initiative, designed to ensure that feeding tube connectors are incompatible with the connectors for unrelated delivery systems such as trach tubes, IV lines, and catheters. Misconnections involving such medical devices may be relatively rare compared with the number of patients needing tubes or IVs, but such misconnections can have deadly consequences when they do occur.
ENFit is a global initiative that affects end users, manufacturers, and suppliers. The ENFit Connectors were developed as part of the Stay Connected initiative under the supervision of clinicians, manufacturers, and regulators.

What is AMTs Role?
AMT will be in compliance with the enteral connector requirements of ISO 80369-3, better known as ENFit, established by the governing bodies to manage the changeover. During the interim period, AMT has made enteral feeding transition adapters available to smooth the transition while continuing to protect patients.
What Does this Mean for You?
What is changing is how you connect your food source to the feed set, which in turn connects to an enteral feeding device. The straight or right angle connectors, which attach and lock into low-profile feeding devices, will remain the same. The distal end of feed sets, which connect directly into the device, are not regulated at this time. However, the proximal side of the feed set, your bolus or y-port adapters, will begin to incorporate the ENFit design into newly created product lines.

Applied Medical Technology #M1-1-1824-I, AMT 18 FR MiniONE Non-Balloon Button - ENFit Compatible, Stoma Length 2.4 cm, Each

Applied Medical Technology #M1-1-2024-I, AMT 20 FR MiniONE Non-Balloon Button - ENFit Compatible, Stoma Length 2.4 cm, Each

Applied Medical Technology #M1-1-2417-I, AMT 24 FR MiniONE Non-Balloon Button - ENFit Compatible, Stoma Length 1.7 cm, Each